Looking for new posts? Head over to my new blog at https://bjcant.dev
This past week was spent building on my last project for the Learn-Verified program. My Flash Cards app just got a fancy jQuery upgrade!
The requirements
In the first iteration of the project, I went a little overboard with features. While that is not necessarily a bad thing, I decided to stick to the requirements this time around. They are listed here, in short:
- Use Ruby on Rails to create an API by rendering model data as JSON objects
- Retrieve said data with AJAX requests using jQuery, converting the data into JavaScript Model Objects
- At least one JS Model Object must have one or more methods on the prototype.
- Must have at least one #index action rendered using jQuery and the JSON response.
- Must have at least one #show action rendered using jQuery and the JSON response.
- The rails API must reveal at least one has_many relationship in the rendered JSON response.
- Create a resource using an AJAX POST request, and render the newly created resource without reloading the page.
As it turned out, most of these requirements could be fulfilled while working with my StudySet model. Let’s take a look.
JS Model Objects and rendering JSON with RoR
Fortunately, Rails makes rendering an ActiveRecord model easy with render json: @model_name in the controller.
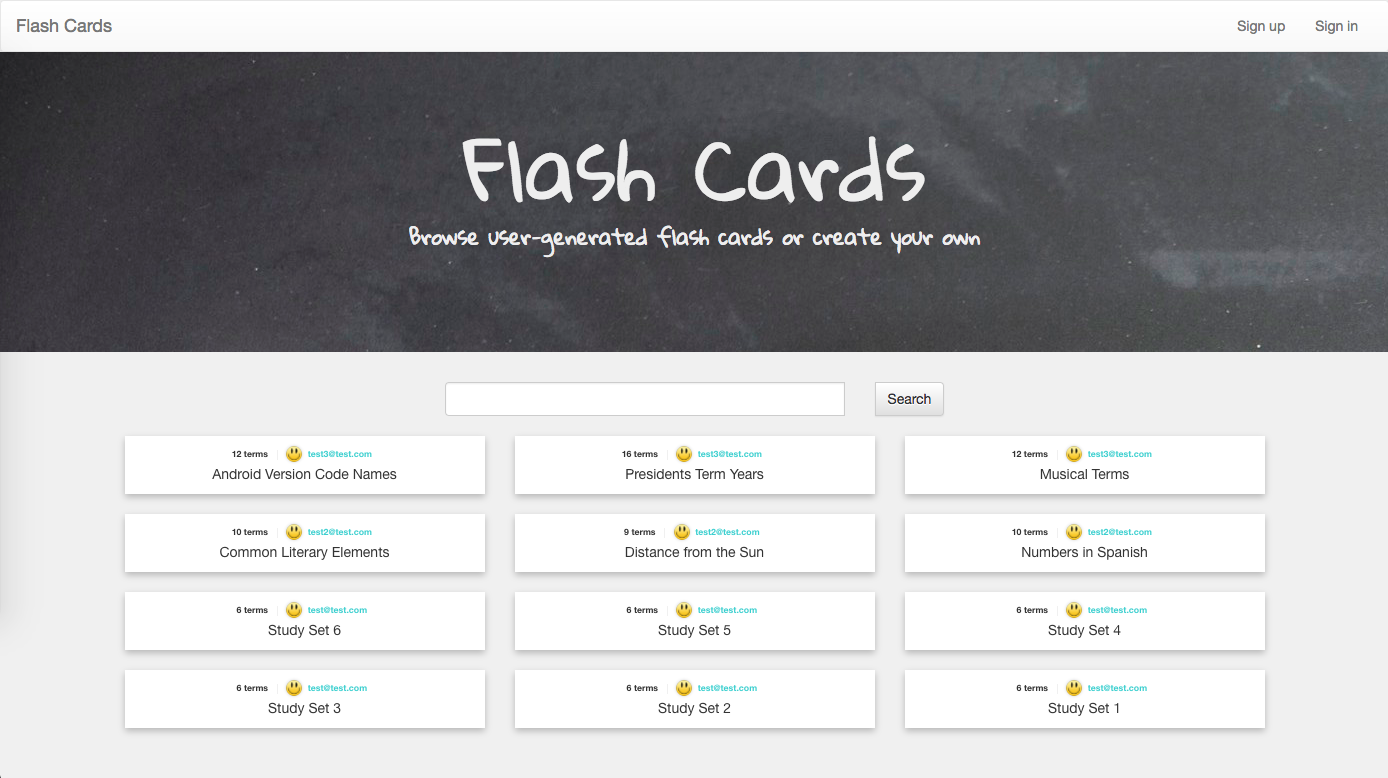
The root path of the Flash Cards app is my study_sets#index view.

As you can see, there is a search bar to filter through the list of all study sets. Pressing the “search” button loads an jQuery AJAX GET request.
//study_sets.js

function getSearch() {
  //get the search params
  var value = $("#search").val();

//AJAX GET request with search params
  $.get("/study_sets.json?search=" + value, function(sets) {

// handle empty response
    if(sets.length === 0) {
      $(".col-md-4:not(:last)").html("");
      $("#searchResults").html("<p>Sorry, no study sets were found!</p><p>Try again or go <a href='/'>back</a></p>");

    } else {

// build JavaScript Model Objects
      var str = { studySets: transformStudySets(sets)};

// create Handlebars template
      var source = $("#studySet-template").html();
      var template = Handlebars.compile(source);

// empty container
      $(".col-md-4:not(:last)").html("");

// add rendered template to view
      $("#searchResults").html(template(str));
      $("#searchResults").append("<p><a href='/'>Back</a></p>")
    }
  });
};
If you don’t know about Handlebars JS templates, you can find out more here.
Based on what study sets are currently in the database, if I search “number,” my url will look like this /study_sets.json?search=number. The JSON response from my Rails API looks like this
[
  {
    id: 7,
    title: "Numbers in Spanish",
    description: "Numbers...in Spanish",
    flash_cards: [
      {
        id: 37,
        term: "Uno",
        definition: "One"
      },
      {
        id: 38,
        term: "Dos",
        definition: "Two"
      },
      {
        id: 39,
        term: "Tres",
        definition: "Three"
      },
      {
        id: 40,
        term: "Cuatro",
        definition: "Four"
      },
      {
        id: 41,
        term: "Cinco",
        definition: "Five"
      },
      {
        id: 42,
        term: "Seis",
        definition: "Six"
      },
      {
        id: 43,
        term: "Siete",
        definition: "Seven"
      },
      {
        id: 44,
        term: "Ocho",
        definition: "Eight"
      },
      {
        id: 45,
        term: "Nueve",
        definition: "Nine"
      },
      {
        id: 46,
        term: "Diez",
        definition: "Ten"
      }
    ],
    owner: {
      id: 2,
      email: "test2@test.com",
      image: "https://upload.wikimedia.org/wikipedia/commons/thumb/5/51/Mr._Smiley_Face.svg/2000px-Mr._Smiley_Face.svg.png"
    }
  }
]
In my getSearch() function, there is a call to transformStudySets(). This function takes the array of the JSON response and creates a new JavaScript Model Object for each element.
// study_sets.js

function transformStudySets(studySets) {
  var sets = [];
  studySets.forEach(function(set){
    sets.push(new StudySet(set["id"], set["title"], set["description"], set["owner"], set["flash_cards"]))
  });
  return sets;
};
The array of transformed study sets are placed into an object assigned to the variable str. str is then rendered in the index page through the compiled Handlebars template.
This takes care of requirements 1, 2, and 4.
Has_many relationship and prototype methods
These two requirements are taken care of in the context of the Handlebars template explained above. If you see this study set:

You can see it says “10 terms”. That number is representative of the number of flash cards within the given study set. Can you say “has many?”

Passing the number of flash cards to the Handlebars template takes two steps. The first is creating a method on the StudySet object.
// study_sets.js

class StudySet {
  constructor(id, title, description, owner, flashCards = []){
    this.id = id
    this.title = title;
    this.description = description;
    this.ownerId = owner["id"];
    this.ownerImage = owner["image"]
    this.ownerEmail = owner["email"];
    this.flashCards = flashCards;
  };

  flashCardCount() {
    return this.flashCards.length
  }
};
The flashCardCount() method returns the length of the flashCards array. One would think that is all we need, but unfortunately Handlebars templates can’t read functions natively. In order to introduce some logic, we need to register a Handlebars helper.
// study_sets.js

Handlebars.registerHelper("flashCardCount", function() {
    return this.flashCardCount();
});
Now the flashCardCount() method is accessible in the Handlebars template like so: ``. Pretty cool! Now we have requirements 3 and 6.
Rendering a show view
If you read my last post, you may have seen the “Study mode” I created in the study_sets#show view. Study mode renders the flash cards within a study set as actual cards that can be flipped on click. In order to meet the requirement to render a show view without reloading the page, I opted to refactor my study mode feature.
In my StudySet controller, the study_mode action looks like this:
#study_sets_controller.rb

  def study_mode
    @study_set = StudySet.find_by_id(params[:id])
    @study_set.add_studier(current_user)
    render json: @study_set
  end
The method is simply responding to a GET request. The “Search mode” button has a data-id attribute and data-ownerId attribute to build the nested URL for the request.
//study_sets.js

function studyMode(event) {

//build url with data attributes
    var ownerId = $(this).data("ownerId");
    var id = $(this).data("id");
    var url = "/users/" + ownerId + "/study_sets/" + id + "/study_mode";

//save GET response to a variable
    var jqxhr = $.get(url, function(data){

//save new StudySet JS Object Model to a variable
      var studySet = new StudySet(data["id"], data["title"], data["description"], data["owner"], data["flash_cards"]);

//build Handlebars template
      var source = $("#studyMode-template").html();
      var template = Handlebars.compile(source);

//render study set template
      $("#study-sets").html(template(studySet));
  })

	//handle failure
	.fail(function(){

	//add failure message to page
    var alert = "<div class='flash-messages'><p class='alert'>You must be signed in to use this feature!</p></div>";
    $(alert).insertBefore(".jumbotron");
  });
};
“Study mode” only works if a user is logged in, so we have an error handler to add a flash alert to the page if a guest tries to press the button. Requirement no. 5 is in the books!
Creating a new resource
The biggest challenge I had was with creating a new resource. Manipulating data is always a little trickier than simply reading it. My idea of an “add a flash card” button in the StudySet show page seemed to fit the bill well.
My #create action in the FlashCard controller looks very standard. The only main deviation is the use of render json: @flash_card. My FlashCard JavaScript Object Model looks like this:
//flash_cards.js

class FlashCard {
  constructor(id, term, definition, studySet){
    this.id = id,
    this.term = term,
    this.definition = definition,
    this.studySet = studySet
  }
}
I opted to keep my event handler for the form submit in study_sets.js because the event is called within the study_sets#show view.
//study_sets.js

function submitNewFlashCardListener() {
  $(document).on("submit", ".study_sets.show .new_flash_card", function(event){

//keep the form from reloading the page
    event.preventDefault();

    var $form = $(".study_sets.show form");

//serialize form values
    var values = $form.serialize();
    var $input = $(".study_sets.show input[type=submit]");

//save POST response to a variable
    var posting = $.post("/flash_cards", values);

//success handler
    posting.done(function(data) {

//build Handlebars template
      var source = $("#flashCard-template").html();
      var template = Handlebars.compile(source);

//instantiate new FlashCard JS Object Model
      var flashCard = new FlashCard(data["id"], data["term"], data["definition"], data["study_set"])
      $("#flash-cards").append(template(flashCard));
    });

//reset "add flash card" button and form".
    var $addFlashCard = $("#addFlashCard");
    $addFlashCard.addClass("hidden");
    $addFlashCard.find("input[type=text]").val("");
    $input.prop("disabled", false);

  });
};
Lo and behold, the final requirement is met!
Takeaway: Class-based Targeting
Easily the biggest frustration I had with this project was fighting against event-handling. With so many event handlers set up for specific pages, my initial solution was not working. In the end, I found something that was satisfactory: Class-based targeting.
In my application.html.erb layout, I added a couple variables to the body class.
<body class="<%= controller_name %> <%= action_name %>">
For all event handlers, I just needed to follow this pattern:
$(document).on(eventType, ".model.action .element", function(){};
An example of this is in studyModeListener():
//study_sets.js

function studyModeListener() {
  $(document).on("click", ".study_sets.show #studyMode", studyMode)
};
The call to $(document).on() ensures that the event is bound to the document. The event may not bind to the element if it is not loaded initially. The middle parameter with ".study_sets.show" is where class-based targeting comes in. It is providing the context of the study_sets#show view. The " #studyMode attribute is the actual element we are targeting.
If you are having issues with buttons not working on click, or only working sometimes, consider using class-based targeting.